School starts in 4 weeks! So, it's time to start getting my decor ready! I purchased these book baskets from Really Good Stuff last year and based the color scheme in my classroom around them. My room was so bright and welcoming, I decided to make my pom-poms these colors, too.
I've seen tissue paper pom- poms for years and have never tried to make them because I'm not always as crafty as I imagine myself to be. A few weeks ago I decided to go for it. I've always liked the way they look in the corners of bulletin boards, bundled together and lost myself imagining how they would look on my bulletin boards (Adorable, I hope).
I started at Walmart, where packs of tissue paper (6 sheets in a pack) were 98 cents each! I bought 2 packs of each, preparing for any possible mistake I would make. You'll also need a pair of scissors and a stapler.
The first thing I did was take 3 of the 6 sheets from a green pack and lay them flat on top of each other.
I tried to flatten out some of the creases, but figured it would be alright as is; it was. :) So, the next thing I did was fold all of the sheets in half.
Then, I folded it over again, to make a small rectangle.
The next part can be kinda tricky. You want to take the corner that is not connected to a spine and fold it over to the longer spine to make a triangle. You will have a rectangle of tissue paper that has nothing folded onto it, that's okay. If you look at the picture above, the diagonal crease is where the tissue paper will be folded. To see the fold completed, keep reading!
Now you'll need some scissors. Cut off the rectangle portion that does not have any part of the triangle folded onto it. You won't need those pieces anymore, but can re- purpose them in another way. Next, you want to open up the triangle and cut along the remaining spine. You should end up with a stack of unattached squares, keep them in a pile.
Next, you will fold your tissue paper, accordion style. I folded mine into about 1 inch sections, you can do the same, or fold a little more or less.
After you've folded your square, keep them stacked and staple it in the center. Next, you'll cut both ends of the stack to create the ends of your pom-poms. I cut mine into an arch shape, but I've seen them cut into points, among others, and they've all looked good!
They may not look perfect, but don't worry, the imperfections just make them more interesting! :)
Now that you've folded, stapled, and cut, you're ready to pull apart the pieces of tissue paper and make your pom-poms! Start on either side of the paper and pull sheets apart gently. Some may rip, but it won't affect how it looks.
I tried to fluff the tissue paper while I went, but it was easier to do at the end. Continue separating all of the tissue paper until it's all finished, then fluff away!
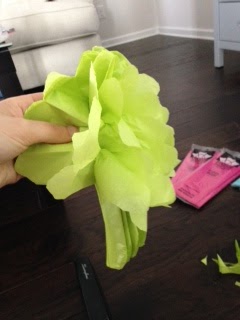
Here's my finished product...
I think it came out pretty well for my first try! It definitely was not as difficult as I thought it would be and it looks adorable! After completing this one I moved on to get my other colors done. It was a bit time consuming, but I got a system down, assembly line style, completing one step at a time on all of the pom-poms before moving on to the next step.
Here's a peek at halfway done...
I ended up making 20 pom-poms from 10 packs of tissue paper. Cute decor for under $10, I'm all for that!
I won't be able to get into my classroom to set up for a few more weeks, so the pom-poms are hanging out in my garage til then. I'll be sure to post my adorable bulletin board when it's ready!
-Mrs. O